
Feeding a Crowd doesn’t have to be stressful. Relax.
Try One or Two of These Ideas and Recipes
Feeding a crowd is more about the presentation than the food itself. Not that quality doesn’t matter, but the presentation is what will attract your guests.
Feeding a Crowd a Meal
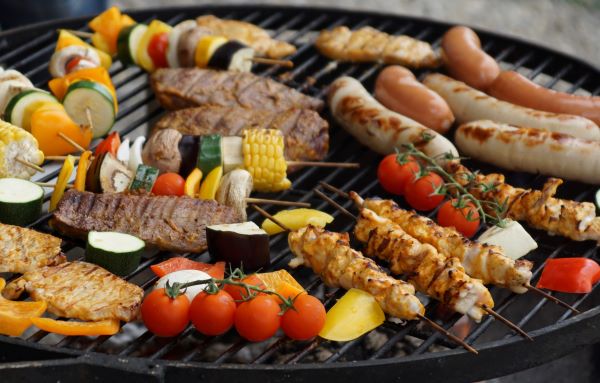
Grill Out!
I have a whole page about how to Grill Everything at Once. Grilling is a great option for feeding a crowd, as the cooking surface on most grills is significantly larger than most kitchen pans…and grilling is a both a healthier and a tastier option. Serve grilled items on large platters, right off the grill. Easy sides, like a green salad, potato salad, slaw, green beans, rolls and/or crockpot mac & cheese (see below) should surround your meat selections, making a savory smorgasbord for your guests.
Of course, any leftovers can be stored for meals later in the week. See Leftovers for ideas.
Crockpot Mac & Cheese
Have a crowd coming for dinner? It’s hard to go wrong with Mac & Cheese. Make this dish early, and let it slowly cook in the crockpot, while you get the house and other food ready. There’s also an InstaPot version below.
- For the topping…set this aside once mixed. It’ll keep just fine. Mix Panko crumbs in melted butter with herbs of choice (garlic, pepper, parsley, basil, etc.) and set aside. Other bread crumbs will work, but Panko crumbs remain crunchy longer. My favorite herb mixture for this topping is Garlic & Wine sprinkles from The Melting Pot.
- 4 cups chicken or vegetable broth
- One 16 oz package of ‘short’ pasta (macaroni, shells, rotini, penne, whatever you like. You can even use multiple types in the same dish. I’ve done this several times, and nobody even notices.)
- 16 – 20 ounces of cheese, shredded or cut into small cubes. (Use multiple kinds of cheeses, like sharp cheddar, white cheddar, gruyere, monterrey jack, even Velveeta. This makes a MUCH tastier Mac & Cheese than using a single type of cheese. Also use block cheese and shred yourself, if possible. The pre-shredded cheese is too waxy and doesn’t melt as well.)
- 1/4 cup grated Parmesean, Romano or Asiago
- 1 cup milk or cream
- 1/2 stick of butter, cut into 8-12 slices
Add Broth, pasta, all cheeses and milk/cream to crockpot. Top with slices of butter. Set crockpot to low and let cook for 3 – 4 hours. Stir, if needed, then top with breadcrumb topping, add a serving spoon and you’re ready to go!
InstaPot version of Mac & Cheese
You can also make this in an InstaPot, but you’ll need to make a few changes. This method is much faster, but requires a more hands-on approach. First, add broth and pasta to InstaPot, set pot to cook for 5 – 6 minutes fully sealed. When the chime on the InstaPot indicates cooking is complete, use the rapid steam release to depressurize the pot as quickly as possible. Remove the lid and add the remaining ingredients, except the breadcrumb topping. Stir until all cheese is melted. (It helps to have shredded cheese for this version, rather than cubed…and definitely not the pre-shredded kind.) Top with breadcrumb topping, add a spoon, and you’re off to the races! You can also put the lid back on and take this version with you to a pot-luck dinner.
Cobbler for Dessert
Can’t forget dessert! Here’s an easy recipe for a fruit cobbler that you can make in the oven, crockpot or InstaPot. It’s just 5 ingredients, plus vanilla ice cream to top if off, if you want. And, best of all, there’s NO MIXING. That’s right, no stirring or mixing required.
- 1 – 1 1/2 cups of milk
- 2 – 3 Cans of fruit or fruit pie filling…or 2-3 cups fresh fruit, sliced, or berries. (Any fruit or berry you like in a cobbler will do. You can even mix it up, like 1 can of peaches, one can of pears and a jar of cherries.)
- 2 cups self-rising flour
- 2 cups sugar
- 1 1/2 to 2 sticks of butter, cut into slices, COLD…DO NOT MELT (you will be very unhappy with the results if you melt the butter first.)
- Vanilla Ice Cream, if desired
If using a firm fresh fruit, like apples or pears, you’ll need to soften them a bit first by cooking on stovetop, crockpot or Instapot with a little butter or fruit juice. You may also want to season these fruits with cinnamon or nutmeg while softening. Otherwise, this is a dump and go recipe.
Choose a large oven-safe dish, a crockpot or an InstaPot. Add ingredients, in order, one at a time to the dish or pot, with the pats of butter on top.
Oven: cook 38 – 45 minutes in a 400 degree F oven.
Crockpot: set to High and cook for 2 hours OR set to Low and cook for 4 hours.
InstaPot: Set valve pressure to sealed. Cook for 10 minutes, then do a quick release of the pressure and serve immediately.
Serve hot and topped with vanilla ice cream. Your guests will think you’re a gourmet chef!
Alternatives:
- Halve recipe if it’s just you and your family, using just one can of fruit or 1 to 1 1/2 cups fresh fruit or berries. Cooking time may shorten a bit, too, so keep an eye on it.
- You can substitute one cup of flour and one cup of sugar with a single box of cake mix (yellow or white work best)
Feeding a Crowd Dips
Anytime you’re feeding a crowd, dips are a great choice. Whether sweet or savory, dips are always a crowd favorite.
Chocolate Hazelnut Dip
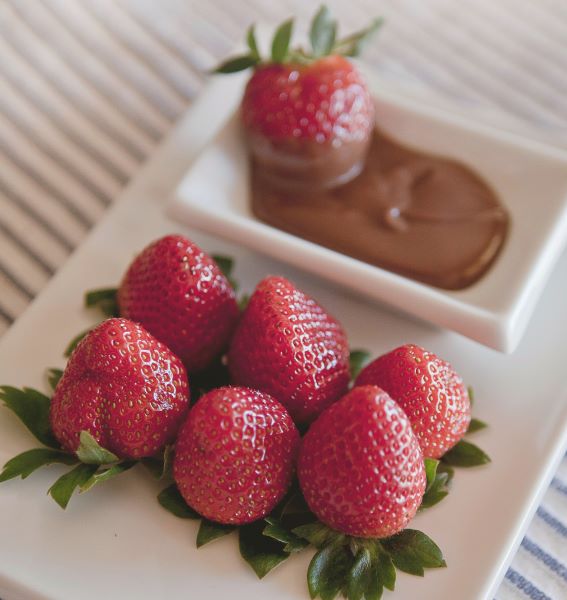
Who doesn’t love chocolate? This recipe is so simple and absolutely delicious! More than one of my friends has actually referred to this dip as ‘orgasmic’. I’m not sure I’d go quite that far, but it really is unbelievably delectable. And it’s made with just TWO ingredients, so it’s super easy and crowd-ready in seconds:
- Nutella or other hazelnut chocolate spread
- Coconut Oil
That’s it! That’s all you need to make the most delicious chocolate hazelnut dip you’ve ever tasted.
Bring Coconut Oil to room temperature (76 degrees F) or warmer, if you prefer. I like to heat it a bit in the microwave…20 seconds is all it takes. Then add the Nutella and stir. Coconut Oil is liquid at room temperature. — You can also use the ‘always liquid’ forms of Coconut Oil, if you prefer.
For a large batch, use an entire large jar of Nutella. (You can store any leftovers back in this same jar. It’s shelf-safe.) In a large bowl, mix liquid coconut oil into the Nutella to your desired consistency. I use about an ounce of coconut oil for every 4 – 5 ounces of Nutella.
Serve in a small crockpot to keep it warm or in a heated chocolate fountain, with fresh fruit, berries and/or even a box of store-bought plain cookies, like sugar cookies or shortbread cookies. You can also serve this dip in a simple bowl, but make it a microwave-safe bowl, as you may need to reheat (20 seconds at a time, MAX, please) from time to time.
Also, if you’re serving in a chocolate fountain, make sure it’s a heated fountain, so the coconut oil remains in a liquid state. Additionally, you may find it flows better with additional coconut oil to thin the mixture.
Savory Seafood Dip
This is another, 2-Ingredient Dip that’ll be crowd-ready in just a few minutes.
- 1 Block Softened Cream Cheese
- 1 Can Cream of Shrimp Soup (or any other Cream of ‘seafood’ Soup)
Place cream cheese on a deep plate or in a shallow bowl. Pour cream of shrimp soup into a sauce pan or microwave-safe bowl. Heat until hot (about 5 minutes on medium-high heat on the stove, or about 3 minutes in the microwave.) Pour heated soup over softened block of cream cheese. The hot soup will begin to melt the softened cream cheese block, making a lovely pattern. Serve with sturdy crackers, pita chips, pretzel chips, etc.
You can also mix the two ingredients together in a bowl, if you prefer, and garnish with some pretty green herbs, like fresh parsley or basil.
Feeding a Crowd Appetizers
Taquitos
Have you seen those boxes of 50+ taquitos in the freezer aisle? Get those. (I like Delimex brand, but any brand will do.) But, there are lots of frozen appetizers and meals in the freezer aisle. Why these? Because they’re a great value for the money, they’re versatile and they’re easy to cook in large batches. Here’s how:
Heat entire package (or packages) altogether on one or more baking pans/sheets in a single layer in a 400 degree F oven for 14 – 18 minutes.
While those are cooking, get your dips ready: Guacamole, salsa, queso. You can make your own or use store-bought. Just put them into pretty bowls with spoons to display next to, or in the middle of, your pile of taquitos.
Once heated, pile them onto a serving tray. If you’re serving multiple flavors, it’s a good idea to put each on it’s own platter, or separate them with the dips on a large platter. You can serve the taquitos whole, or cut them in half. I find the half-taquitos easier to put on the smaller, appetizer-type plates, if that’s what you’re supplying for your guests to hold their food. Your dips can be in the middle of the pile(s) or beside it/them.
Will this be the main meal, rather than appetizers? Add a big bowl of tortilla chips, some sliced avocado, a bowl of Mexican rice and some corn or other roasted veggie to make a big display. And don’t forget the margaritas!
Seems too easy, right? Remember, with a crowd, it’s all in the presentation. A simple pile of taquitos served on a platter with pretty bowls of dips looks very appetizing.
